Author Archive: Indy

MSR MiniGroundhog – Tent Stakes

Disclaimer: Gear porn is not a review nor an endorsement of a product, it is exactly what it sounds like. Close ups and in depth pictures and details about various hiking equipment

MSR MiniGroundhog – Tent Stakes

msrmini-3

Quick Specs

Color Red
Weight .35 oz / 10 g
Length 6 in / 15 cm
Material(s) Aluminum 7000 series
Country of Origin Made in Korea

msrmini-8

msrmini-4

msrmini-7

msrmini-6

msrmini-1

From the Front of the package:

Tent and Shelter Accessory

Mini Groundhog

Tent Stakes

Lightweight, compact all-purpose tent stakes

MSR

Mountain Safety Research


msrmini-2

And From the Back:

Mini GroundHog

Tent Stakes

  • Reliable: Y-beam design penetrates and holds in firm soil.
  • Durable: 7000-series aluminum is light and strong
  • Convenient: Pull loop for easy removal.
  • Lightweight: Only 9 grams per stake – almost 40% lighter than standard Groundhog Stakes.

INCLUDES: 6 MiniGroundhog Tent Stakes

Instructions:

Place stake through stake loop or guy line loop. Push into ground with hand. To remove, do not kick. Wiggle with hand as you pull up. If necessary, wrap stake loop around head of stake for additional grip before pulling out.

2012 Cascade Designs, Inc.

4000 First Avenue South | Seattle, WA 98134 U.S.A.

Made in Korea

www.msrgear.com

ART# 80-991 | 04/2012

Mini GroundHog Tent Stakes SKU#06893

0 040818 068939

msrmini-5

On Amazon

Company Website

From my Mom’s Point of View

Last year I did a five night backpacking trip in the Boundary Waters Canoe Area with my mom and her german shepherd Dux. I recently got the photos that she took while we were up there. Everyone has there unique perspective and this is hers.


20140531_142703

How do you keep the bears out of your garbage?20140603_093736

Dinner from the warmth of the tent on after a rainy day of canoeing.20140603_164940 20140603_165011 20140603_165036 20140604_083917 20140604_083930 20140604_084051 20140604_084125

Drying out our wet clothes.20140604_084127 20140604_084455 20140604_152002 20140605_092759

The outdoor facilities, never had a better view during the morning constitutional.20140605_132021

Not as heavy as it looks but awkward enough to cause some issues on tight portages.20140605_132038-1

Toiletry Kit (Dopp Bag)

Disclaimer: In no way is this the be-all and end-all to gear lists, some will need more stuff, others will need less. Take as much as your trip requires, enough to be safe, and enough to be comfortable.

Toiletry Kit (Dopp Bag)

A toiletry kit, or dopp bag, is the bag containing all your stuff to keep you clean and healthy out in the woods. This is your standard bathroom gear; toothbrush, toilet paper, etc. that you’ll need to get by.

BDE_8001

The Bag Itself.

Just a container for stuff, can be as fancy or cheap as you want.

Cheap solution: Ziploc Bag. With ziploc bags you get a semi-waterproof solution that’s clear and easy to see all the contents. Did I mention it’s cheap and comes in just about every size that you could imagine?

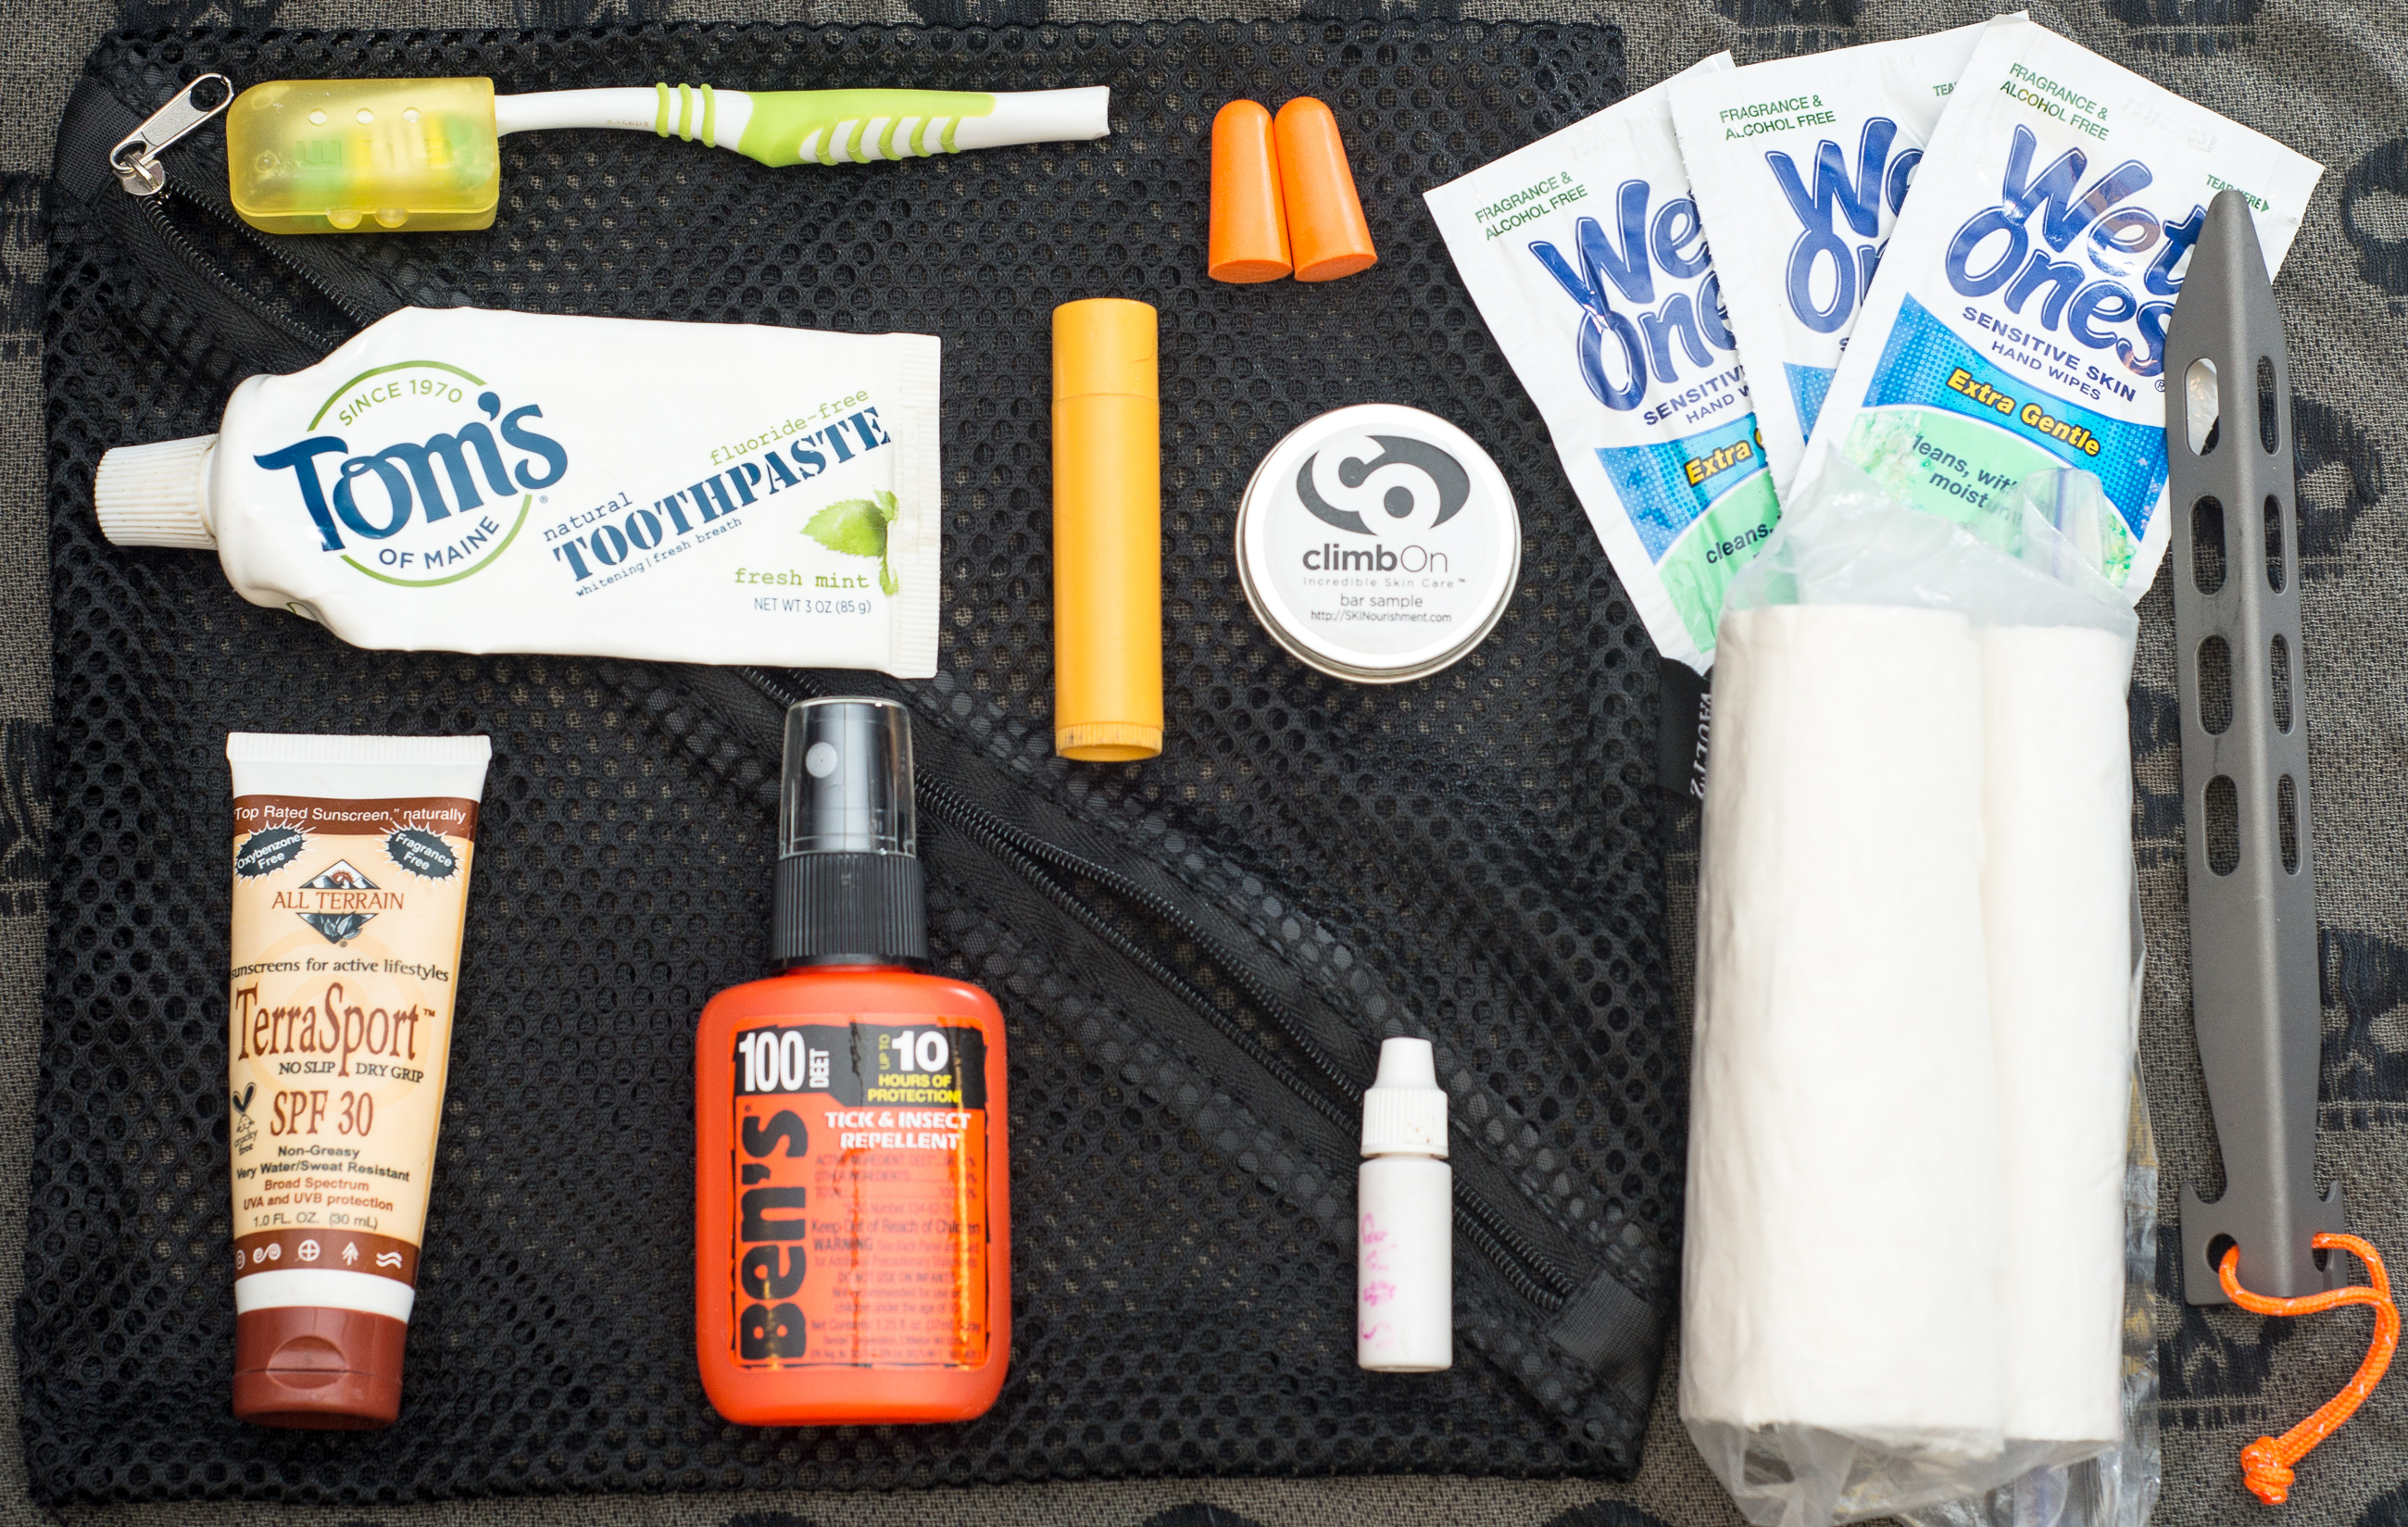
Mid level solution: Mesh zippered bag. This is actually my go to solution for a toiletry kit, it’s easy to see all the contents, and easy to dry out the contents if need be. Most of the contents of the bag are each in their own waterproof container so I’m not all that worried about getting it wet.

Other Mid level Solution: Stuff sack. These can come in waterproof flavors and any size and shape that you’d like. The big downside with these is that you typically have to pour out all the contents to find the item you’re looking for.

High end solution: Eagle Creek Dopp Bag. The high end solution is a specialty made dopp bag for backpacking. These can typically run for about twenty bucks.

Staying Clean.

Cleanliness is next to something…something.

Toilet Paper:

No matter what kind of toilet paper you’ll be bringing it’s strongly advised to pack it inside of it’s own plastic bag to keep it dry, wet toilet paper can easily become a mess and completely unusable. And if you don’t know how to go without it, this would be inopportune time to figure out what leafs are poisonous or not.

Crapping in the woods can be a bit daunting to most at first, but there is a great book on the subject How to Shit in the Woods, it even comes in audiobook flavor as well.

You have three major options for toilet paper in the woods.

Normal Toilet Paper: While all toilet paper is biodegradable some are better for the environment then others.

Specialty Biodegradable Toilet Paper: Camping toilet paper that is made to biodegrade quickly and isn’t processed with any harmful chemicals. This TP tends to run a bit on the thin side so may end up using more of it then you would normally.

Paper Towels: Some prefer paper towels to normal toilet paper, as it holds up better than normal TP. It’s still biodegradable and you should be able to get by with less of it to do the same job.

Depending on the environment you’re hiking in it may still be advisable to pack out what your waste. Sensitive alpine areas, anywhere close to a water source, and deserts it is better to pack out your waste.

Wet Wipes:

Either buy a big pack and repackage them in a Ziploc bag or buy the ones that are prepackaged for individual use. I prefer Wet Ones for sensitive skin.

Soap:

Something biodegradable and repackage in a small container. You’d be surprised by how much Add Mediayou actually need. I typically do all my washing up with wet wipes so I use soap very seldom. The hiker staple has always been Dr. Bronner’s Peppermint Liquid Soap. This soap can also double as toothpaste if you’re daring.

Toothbrush:

No need for an expensive specialty half size toothbrush, get a normal toothbrush from the store and cut off half the handle or as much as you need for it to be comfortable. Put it in a plastic baggie to keep it clean. Easy, don’t over-complicate it.

Toothpaste:

Biodegradable and travel size. Tom’s of Maine is my go to.

Deodorant:

Embrace your stinky side, while this may have a negative effect while hiking with others they most likely won’t be able to smell you over their own stench.

Taking Care of Yourself.

The general daily use items that aren’t meant for keeping you clean.

Bug Spray/Bug Goop:

Don’t be caught without it! I like the 3M Ultrathon for bug goop, and Ben’s 100 for a spray.

Both products contain Deet which some people may be adverse to, and can cause damage to certain materials.

Sunscreen:

To worship our sun god, apply daily. It’s always good to apply this every morning and re-apply as needed. Sun burns are miserable and skin cancer is horrifying. Find something that you won’t sweat off easily. I like TerraSport.

Lip stuff:

It’s Burt’s Bees for me every time. It’s a good thing to bring along even if you don’t typically carry it. There is no telling what conditions you might find yourself in. If it’s really dry or cold you’ll be glad you have it.

Ointment:

Some form of salve for cuts blisters or other ailments you may have. Res-Q Ointment or Climb On Bar are good options.

Body Glide:

Some love others would never use it. It’s a personal lubricant to take care of any areas that are rubbing together while moving.

Comb:

I wear hats so this is a non-issue for me. If you do need one find something cheap and lightweight.

Fingernail Clippers:

For short treks leave them at home, for longer ventures bring them with, find something that won’t rust.

Other’s Toiletry Kits:

Omaha Hike: Hidden Lake Trail

Hidden Lake Trail is hands down one of my favorite hikes in the Omaha area. It has a bit of everything, a few hills, swamps, large lakes, great bird habitats, large trees, lookouts, etc.


imageThis is the start of the trail, as you can see there is a pay booth. If you’re a Fontanelle member all the trails in Fontanelle Forest and Neale Woods are accessible ($35 yearly) otherwise the cost of hiking is a $7 per person donation. Relatively speaking this is probably the most expensive trail that I have ever hiked. To put this in perspective Rocky Mountain National Park has an entrance fee of $20 per vehicle, or perhaps a better example is the beautiful Hitchcock Nature Center just north of Council Bluffs, IA that has an entrance fee of $2 a vehicle or $10 for a year pass.

Map:

image

Right after crossing the road you run into the first of many signs along the trail, above it shows a little map and a bit of information about the area.imageA short ways from the sign you’ll come to the board walk and then the first of many Ys in the trail. I prefer to do the hills first and then to have a easy walk back so I take a right at this junction.

20150513_171826

There are a few little lookouts like this, usually they are a bit easier to get to. Repairs are typically done quickly and everything is fairly well groomed.

image

Hang a left here on Stream Trail, this takes you by a bit of a swampy area and an overlook to one of the two lakes on this trail. The bridge across the marsh is just a bit down the trail and on the right.

image

There are many informational posts along the trail.

image

This is the bridge across the marsh area, across it is when the trail crosses the train tracks and heads into the hills.

image

The upland areas are a bit of a trudge up, but offer great views and a welcome change of the typical Nebraska scenery.

20150513_173042

One of the best views offered on the trail, this one can be easily missed though. On your way up the hill there will be a little offshoot to your left that leads to a wood plank in the ground. On this wood plank there used to be a nice bench to take a break on but it’s been gone for a couple years now.

20150513_174359

After a bit of ups and downs on the trail you’ll come to another split, take a left onto History Trail.

20150513_175702

If you head down History Trail and at the next split take a left. Roughly thirty feet down the trail you’ll run into a grave site where Logan Fontenelle and his family are buried.

20150513_180256

The trail down to the grave sites just dead ends, you will turn around and head back up and take the other unexplored trail. This leads to my favorite part of the trail. It’s an open area and you can see across to where the trail is going. The openness and the amount of undergrowth in the area really give this part of the trail a special feel.

20150513_180437

And heading up on the other side of the valley.

20150513_180915

Another split in the trail, head down on Hidden Lake Trail across the tracks and to the lowlands.

20150513_181217

On down the trail and across the tracks.

image

The remnants of an old bridge that used to stretch across Hidden Lake.

20150513_184512

There are quite a few boardwalks over areas that can get swampy when wet.

image

The lookout signifies nearing the end of the trail.

image

Even though it’s a bit on the expensive side I really love this trail. It has as much variation in scenery and habitats that one can hope for on a short day hike in Omaha, Nebraska.

Stats

  • Distance: 4 Miles
  • My time: 2 Hours
  • Elevation: Half is completely flat, the other half is hills.
  • Difficulty(out of 10): 7 (When dry, parts of the trail are prone to flooding and can get muddy.)
  • Cost: Free to members of Fontanelle Forest (as of writing membership is $35 annually) or $7 per person.

Download GPS file here (right click save as).

Fontanelle Forest Main Site: http://www.fontenelleforest.org/

Fontanelle Map